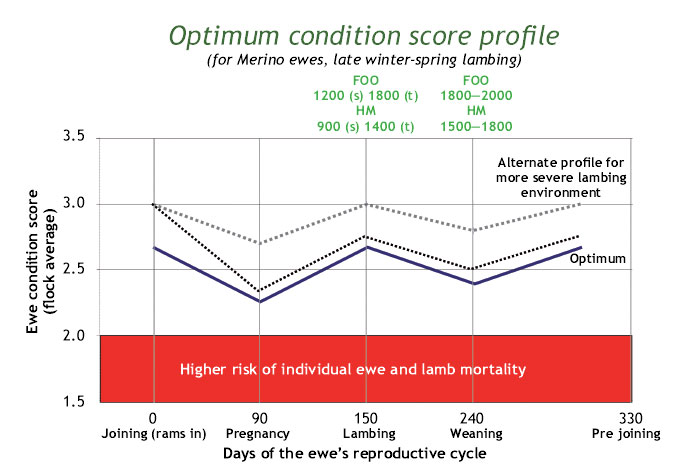
The
late
lambing
optimum
profile
shown
in
Figure
1.
takes
into
account
both
profitability
and
the
health
of
the
breeding
flock
.
Ewe
mortality
generally
increases
with
lower
ewe
condition
by
lambing
(there
are
other
factors
such
as
weather,
age
and
available
feed).
Ewe
condition
in
late
pregnancy
has
a
large
impact
on
lamb
birth
weight
and
therefore
lamb
survival.
There
is a
compensatory
gain
effect
on
lamb
birthweight
when
ewes
that
have
lost
condition
regain
it
in
late
pregnancy.
Twin
lambs
are
more
sensitive
to
this
change
in
birth
weight
(&
survival)
as
their
birthweight
is
usually
further
from the
optimum.
Table
1
shows
the
effect
of
several
profiles
on
both
lamb
and
ewe
survival
.
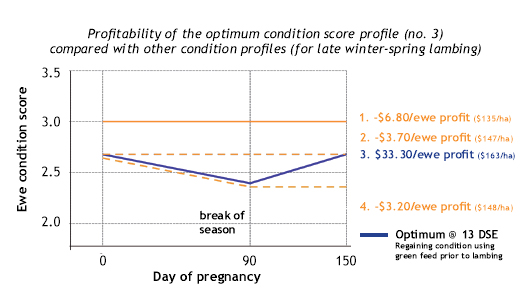
Following
a
profile
that
loses
more
condition
over
autumn
(0.6
CS)
and
only
re-gains
half
of
it
by
lambing
has
similar
profitability
to
that
of
the
optimum
profile,
however,
there
are
large
penalties
in
ewe
and
lamb
survival.
Ewe
mortality
doubles
and
the
survival
of
twin
lambs
is
10%
lower
than
the
optimum
(67%
compared
to
77%).
It
is
also
a
high
risk
option
in
that
if
the
season
fails
to
break
and
ewes
don't
regain
that
small
amount
the
lambing
results
could
be
disastrous,
with
14%
lower
twin
survival
and
further
ewe
losses
.
Table
1.
Difference
in
survival
of
ewes
and
lambs
for
late
lambing
flocks
compared
to
maintaining
condition
score
3.0
throughout
pregnancy
|
Condition
score
|
Survival
%
|
|
joining
|
Day
90
|
lambing
|
singles
|
twins
|
Ewes
|
|
2.6
|
2.3
|
2.6
|
-2.6
|
-0.6
|
-0.5
|
|
2.6
|
2.0
|
2.3
|
-5.2
|
-5.9
|
-1.4
|
|
2.6
|
2.0
|
2.0
|
-9.4
|
-14.2
|
-2.6
|
|
3.0
|
2.7
|
3.0
|
1.0
|
6.3
|
0.1
|
|
3.0
|
3.0
|
3.0
|
0
|
0
|
0
|
Running
stock
to a
higher
profile
such
as
starting
in
CS 3
at
joining
and
losing
0.3
by
the
break
and
re-gaining
all
lost
condition
by
lambing
has
a
slightly
lower
profitability
(-$2.30/ewe)
but
if
there
is a
more
severe
climate
or
irregular
seasons
this
may
be
the
best
option.
This
profile
gives
an
increase
in
lamb
and
ewe
survival
compared
to
maintaining
at
condition
score
3
throughout
pregnancy
but
there
are
small
costs
associated
with
having
the
ewes
in a
higher
condition
at
joini
ng.
The
Condition
Score
profile
is for
the
average
of the
flock.
Usually
in each
flock
there
will be
some
individuals
at least
0.5 of a
condition
score
lower
(and an
equal
proportion
that are
0.5 of a
condition
score
higher).
Individual
ewes
should
not be
below CS
2. Ewes
at or
below CS
2 during
pregnancy
should
have
preferential
treatment
to
regain
condition
prior to
lambing
as ewe
(as well
as lamb)
mortality
increases
dramatically
when
ewes are
below CS
2.
If
the
regain
in
condition
by
lambing
isn't
made
and
the
ewes
continue
to
lose
condition
in
late
pregnancy
to
near
CS
2,
large
penalties
from
ewe
and
lamb
mortality
will
be
incurred.
Even
maintaining
condition
in
late
pregnancy
after
losing
condition
in
early
pregnancy
will
have
an
impact
on
lamb
survival,
particularly
with
twin
lambs.
Any
individuals
in
the
mob
at
or
below
CS2
will
be
at
higher
risk
.
Running
lower
Stocking
Rates
T
hese
profiles
are
also
suitable
for
flocks
run
at
stocking
rates
lower
than
the
optimum.
However,
following
the
lifetimewool
ewe
profile
can
allow
you
to
increase
stocking
rates
safely
and
thereby
increasing
profitabilty.
In
years
that
ewes'
peak
condition
prior
to
joining
is
above
the
optimum,
it
is
worthwhile
following
the
higher
profile
as
described
in
Figure
1
(ie.
joining
in
CS
3,
losing
to
CS
2.7
and
regaining
to
CS 3
by
lambing)
for
that
season
because
extra
productivity
will
result.
Continuing
to
run
ewes
at
this
higher
flock
condition
score
will
give
a
slightly
lower
profitability
to
runninng
ewes
at
the
optimum
profile,
as
the
most
of
higher
cost
of
supplementation
is
offset
by
the
higher
production
gains.
Aiming
to
be
on
this
profile
every
year
or
in
an
average
year
will
be
more
expensive
as
it
takes
more
supplement
to
grow
maiden
ewes
to
the
higher
starting
condition
score
.